
Granting microphone permission on TextNow was straightforward. I accessed settings, selected TextNow, and enabled microphone access. It allowed seamless voice calls and recording, enhancing my communication experience.
‘’To grant microphone permission on TextNow, go to your device’s settings, find the TextNow app under “Apps” or “Applications,” and enable the microphone option. This allows TextNow to access your microphone for calls and recordings.’’
This guide will walk you through the steps to enable microphone permissions on TextNow, whether you’re using an Android, iOS, or a web browser.
What Does Textnow Means?
TextNow is a telecommunications app offering free texting and calling services using Wi-Fi or data. It provides users with a dedicated phone number that works across devices, enabling communication without traditional carrier plans.
TextNow integrates features like voicemail, picture messaging, and call forwarding, appealing to those seeking cost-effective and flexible communication solutions.

Why Is It Necessary To Grant Permission On Textnow?
Granting permission on TextNow is necessary for a few reasons. Firstly, it allows the app to access essential functions on your device, such as contacts, storage, and location, which are crucial for its core features.
For instance:
Accessing your contacts enables you to easily call or message your friends and family. Allowing storage access lets the app save and manage your messages, photos, and other media files.
Location permission helps in tailoring the service to your area, potentially improving call quality and providing localized features. By granting these permissions, you ensure that TextNow can operate smoothly and provide a seamless communication experience.
Allow Microphone Usage In Google Chrome:
Open Google Chrome:
Launch the Google Chrome browser on your computer.
Navigate to TextNow:
Go to the TextNow website or web app.
Access Site Settings:
Click on the padlock icon located to the left of the URL in the address bar.
A drop-down menu will appear with several options.
Open Site Settings:
In the drop-down menu, select “Site settings” to open a new tab with more detailed permissions for the site.
Locate Microphone Permission:
In the Site settings tab, scroll down to find the “Microphone” option.
Change Microphone Setting:
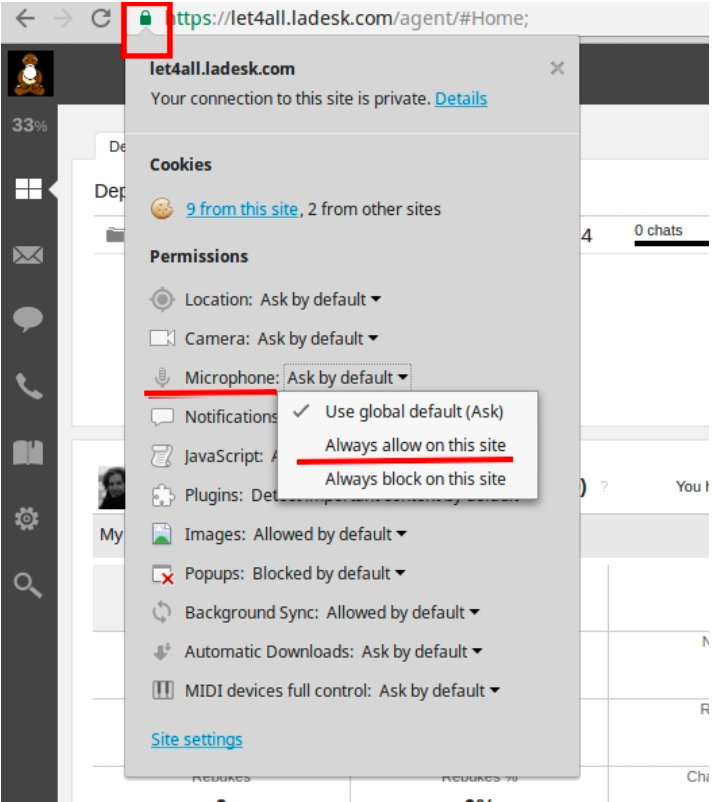
Click on the drop-down menu next to “Microphone.”
Select “Allow” to enable microphone access for TextNow.
Allow Microphone Usage In Android:
To allow microphone usage for TextNow on an Android device, follow these detailed steps:
Open Settings:
Go to the home screen and tap on the “Settings” icon.
Access Apps Management:
Scroll down and select “Apps” or “Applications,” depending on your device.
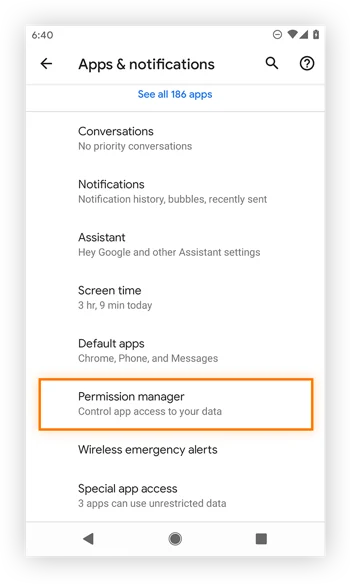
Find TextNow:
In the list of installed apps, locate and tap on “TextNow.”
Open Permissions:
Tap on “Permissions” to view the permissions required by TextNow.
Enable Microphone Permission:
Find the “Microphone” option and toggle it on to grant TextNow access to the microphone.
By following these steps, you can successfully enable microphone usage for TextNow on your Android device, ensuring clear and uninterrupted voice communication.
Allow Microphone Usage In Mozilla Fire Fox:
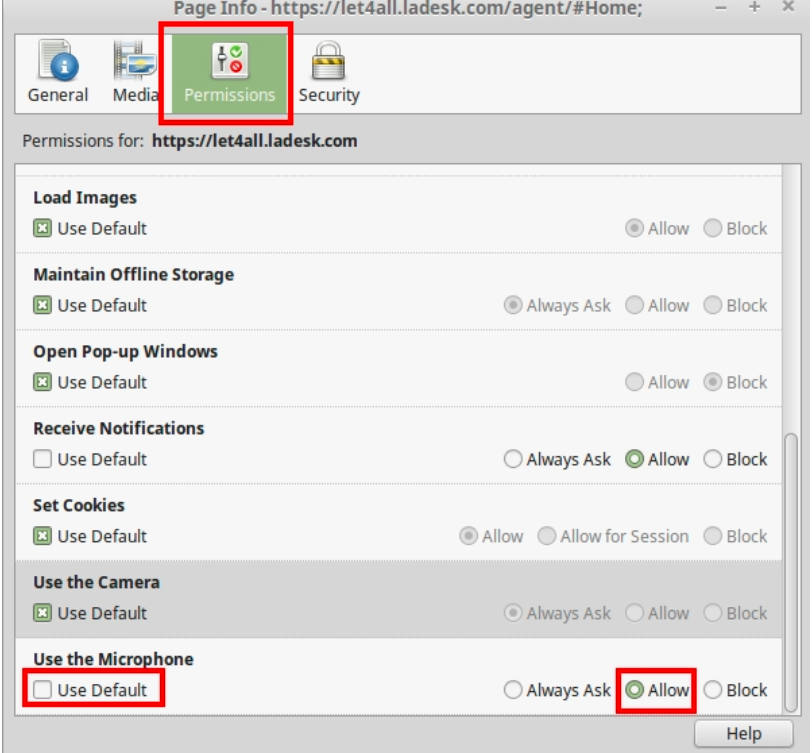
To allow microphone usage in Mozilla Firefox for TextNow, follow these detailed steps:
Open Mozilla Firefox:
Launch the Mozilla Firefox browser on your computer.
Navigate to TextNow:
Go to the TextNow website or web app by entering the URL in the address bar and pressing Enter.
Initiate a Call:
Start a call or any feature that requires microphone access in TextNow. This action will trigger Firefox to request microphone access if it hasn’t been granted yet.
Permission Request:
A pop-up window will appear at the top left corner of the browser window, asking for permission to use your microphone.
Grant Permission:
Click on the “Allow” button in the pop-up window to grant TextNow access to your microphone.
Also Read: How To Use Phone Microphone With Airpods? – Ultimate Guide 2024!
Allow Microphone Usage In Safari:
To allow microphone usage in Safari for TextNow, follow these detailed steps:
- Open Safari Settings:
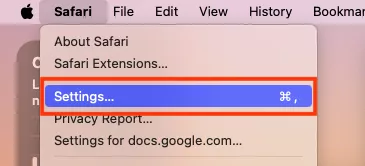
On your iOS device, go to the “Settings” app.
Scroll down and select “Safari.”
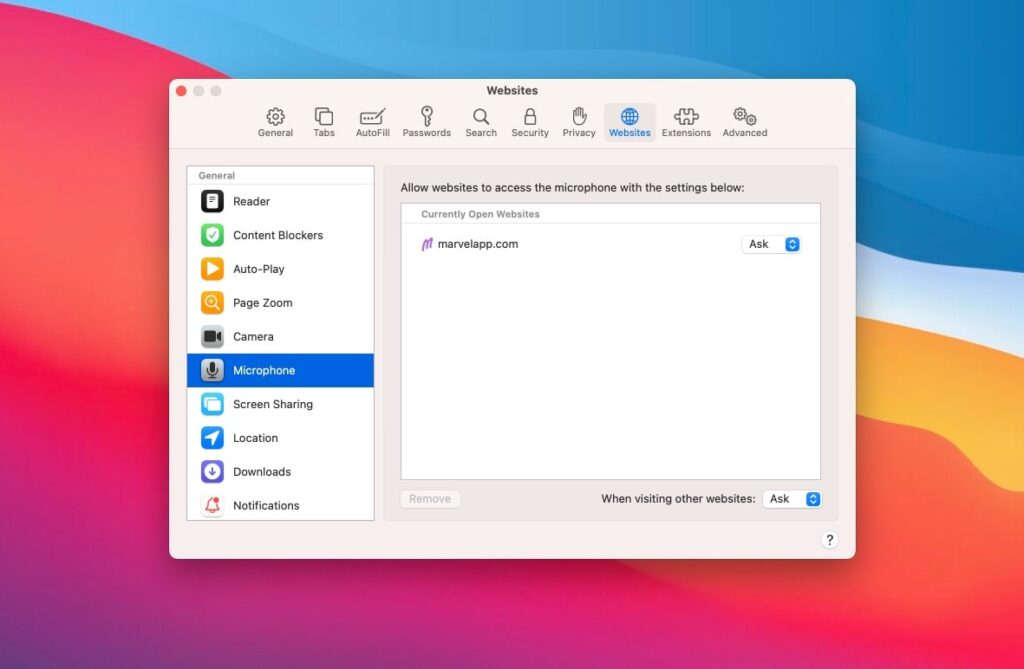
- Check for Website Settings:
In Safari settings, scroll down and tap on “Microphone.”
- Locate TextNow Website:
Under the “Microphone” settings, find the TextNow website. If it’s not listed, you may need to visit the TextNow site in Safari first to prompt a permission request.
- Set Microphone Access:
Next to the TextNow website, ensure that the setting is set to “Allow.” This will enable TextNow to use the microphone.
- Restart Safari:
Close Safari completely and then reopen it to ensure that the new settings take effect.
- Test Microphone Functionality:
Visit the TextNow website and make a call or record a message to test if the microphone is working properly.
By following these steps, you can ensure that the microphone is properly enabled for use with TextNow in Safari.
Also Read: How To Adjust Zoom Microphone Volume? — Ultimate Guide 2024!
Allow Microphone Usage In Windows 10:
To allow microphone usage in Windows 10 for TextNow, follow these detailed bullet points:
- Open Settings:
- Click on the Start menu.
- Select the Settings icon (gear-shaped).
- Navigate to Privacy Settings:
- In the Settings window, click on Privacy.
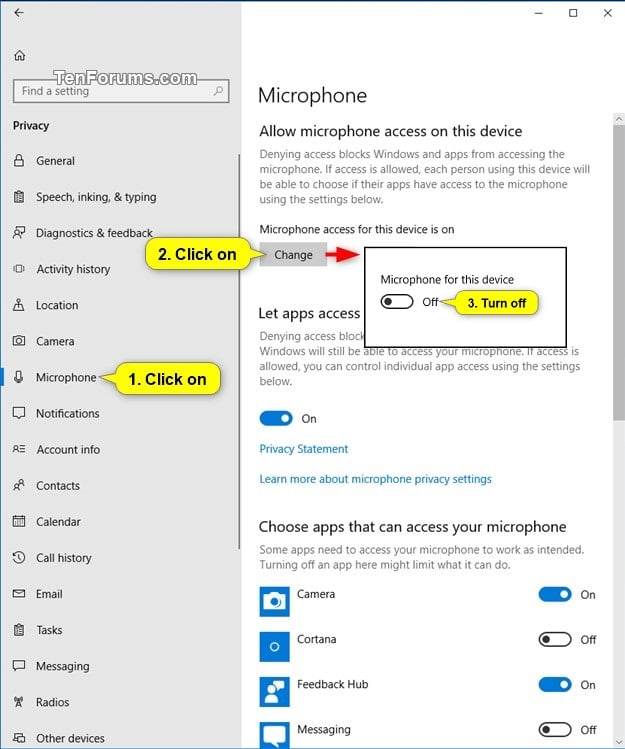
- Access Microphone Settings:
- In the Privacy settings, select Microphone from the left sidebar.
- Turn On Microphone Access:
- Ensure the toggle switch under “Allow apps to access your microphone” is turned on.
- Check Individual App Permissions:
- Scroll down to the list of apps and find TextNow.
- Make sure the toggle switch next to TextNow is turned on.
- Test Microphone Functionality:
- Open TextNow and make a test call to confirm the microphone is working properly.
- Update Drivers:
- Ensure your microphone drivers are up to date. Go to Device Manager (right-click the Start menu and select it), find your microphone under Audio inputs and outputs, right-click, and select Update driver.
By following these steps, you can ensure that TextNow has the necessary permissions to use your microphone on Windows 10.
Also Read: How To Find Out Which App Is Using My Microphone? – Complete Guide 2024!
Advanced Settings For Better Performance:
Adjusting Microphone Sensitivity:
- Open your device’s Settings.
- Go to Sound & vibration.
- Adjust the Microphone sensitivity slider.
Noise Reduction Features:
- Some devices offer noise reduction settings that can improve call quality. Check your device’s sound settings for these options.
FAQ’s:
1. How Do I Know If My Microphone Is Working On Textnow?
To know if your microphone is working on TextNow, make a test call to a friend or use the app’s test call feature if available. If the recipient hears you clearly, your microphone is functioning properly.
2. Can I Use An External Microphone With Textnow?
Yes, you can use an external microphone with TextNow. Connect the external microphone to your device, ensure it’s selected as the default input device, and test it within the app to confirm it works.
3. Is It Safe To Grant Microphone Permission To Textnow?
Granting microphone permission to TextNow is generally safe as long as you download the app from a trusted source, such as the official website or app store, ensuring the app can function properly for calls and voice messages.
4. How Do I Grant Microphone Permission?
To grant microphone permission, go to your device’s settings, find the app permissions section, select the microphone option, and enable access for TextNow. This allows the app to use the microphone for calls and voice features.
5. Why Can’t I Allow Microphone Access On My Iphone?
If you can’t allow microphone access on your iPhone, check if restrictions are enabled under Screen Time settings. Ensure the app is installed correctly and the iOS version supports the app’s microphone permissions.
6. How Do I Give Permission To Microphone On Android?
To give microphone permission on Android, open Settings, go to Apps, select TextNow, then Permissions, and enable the microphone. This allows TextNow to access and use the microphone for calls and voice messages.
7. Where To Turn On The Microphone?
To turn on the microphone, go to your device’s settings, find the privacy or app permissions section, select the microphone option, and ensure it is enabled for the desired app. This ensures the app can use the microphone.
8. Textnow Incoming Calls Not Working?
If TextNow incoming calls are not working, check your internet connection, ensure app permissions are correctly set, and update the app. Restart your device and app to refresh settings and resolve potential issues.
9. How Do I Get The Microphone To Work?
To get the microphone to work, check your device’s settings to ensure the microphone is enabled and selected as the default input. Update drivers if necessary, and test the microphone within the TextNow app or other voice recording apps.
Final Words:
To grant microphone permission on TextNow, go to your device’s settings and find the privacy or app permissions section. Select the microphone option and enable it for TextNow. On iOS, go to Settings > Privacy > Microphone and toggle TextNow on. On Android, go to Settings > Apps > TextNow > Permissions and enable the microphone. This ensures TextNow can use the microphone for calls and voice messages effectively, enhancing your communication experience.
Read More: